It’s summertime and I have been going, going and going!! But I love being busy! I am never bored. Seriously! I had someone ask me the other day if I ever got bored or lonely being home. I didn’t hesitate… the answer is easy…no, not at all. I have so many things to keep me busy and the apartments are just one of them.
You can see all that we accomplished so far in Rental Property Renovation Part One. In Part Two, we tackled the front walls that were in pretty bad shape. This is the first floor.

This is the second floor.

I showed you in Part One, a sneak peek at what our solution was.
We decided to use these to plank the walls.

We considered other options… like scraping and re-mudding, paneling, or drywall. It all just seemed really messy and no guarantee it would come out looking nice. This seemed like the best option.
The wall was kind of crumbling and we didn’t really know what was behind it. So, we felt putting up furring strips was the best way to attach the planks to the wall.

The furring strips are basically really cheap 1x2s. Since our planks were going horizontal, we attached the furring strips vertically. Actually, I didn’t really help much in putting those up, because they were a bear to attach! There was some sort of steel under about 1/2 inch of plaster. It was the weirdest thing! Hubby and my brother were using every ounce of strength and leverage to drill those screws in! First, we ran a bead of Liquid Nails on the furring strip just to keep it up there, then all the screws were predrilled. We burned through a bunch of drill bits! But once they were up, they weren’t going anywhere!!
Putting up the planks was the easy part! The guys cut and I used my nail gun to attach them to the furring strips. Easy peasy!!

It’s starting to look good!! That ugly gap will be filled in with a window trim of some sort.

Planking moves along pretty quick! You can see we put furring strips about every 12-16 inches.

Goober brother, just had to be in the shot!! The wall looks soooo much better!!! =)

For the window casing, we decided to keep it simple. We attached 1x3s around the window. And we also did that for the trim at the ceiling. You can see I already started caulking. Just a but more and fill in all the nail gun holes.

Here’s another look at the window casing. Some of these pictures aren’t the greatest… Lighting and phone pics aren’t always the best…

We basically did the same thing upstairs…Ooops… Here you can see I already started priming.

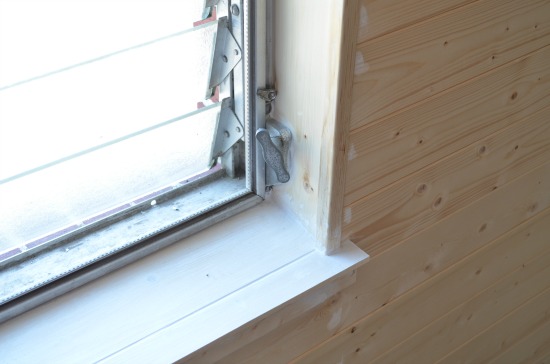
The window casing was a little tricky here. It had to be super thin to work around the screens, screen latches, and cranks. So, we decided to use the planks we used on the walls. They are basically glued on and attached with the nail gun.

We extended the window sill. The added the sides and top piece, then used corner trim to cover the open corners. Lots and lots of caulking, there is always a possibility of water coming in, and we want to protect it the best we can. It turned out better than we thought!

Here's a better close up of the crank side, even though it's partially primed, I wanted you to see what we were dealing with. Hubby had to jigsaw around that crank to make it work.
Now… 2 coats of primer sanding and then 2 coats of paint. Those grooves are gonna be fun!!

Blessings!!


That looks great, such an easy fix. I used to do drywall when I was in my late teens. Summers in Fort Lauderdale, and drywall dust. Best money I made at 18 years old but I was constantly hitting the beach to cool off! This is so much easier and less dust to deal with. You guys did a great job!
ReplyDeleteThanks, Christine! I appreciate it! Yeah... drywall dust is the pits! Thanks for stopping by! :)
DeleteThe planking looks very nice on the walls like that, great idea!
ReplyDeleteWhat a great look. Much like shiplap and this adds so much character. It is an interesting contrast with the glass block. Can't wait to see how it all pulls together. Thanks for inviting me to the link up.
ReplyDeleteHi Pamela! Thanks! We just keep on plugging away... So glad you stopped by!
DeleteBeautiful job! The furring strips were the way to go too. We have block construction on our home and the walls are either concrete of plasterboard so I understand how difficult screwing anything onto a wall can be! Looking forward to seeing the finished project:) XO - Wendi@H2OBungalow
ReplyDeleteHi Wendi! Thanks! Oh, so you know exactly what we're dealing with... Ugh! I can't wait too, to see it all finished! :) Thanks for stopping by!
DeleteI love seeing all the work you guys ate doing to your rental properties as well as your gorgeous home. I wish you lived closer. My poor little house is falling apart and needs so much work done. Unfortunately I'm not able to do the work myself especially since I can't get my arms above my head anymore LoL! Can't wait to see more.
ReplyDelete